
In the era of digital content creation, managing panels, timelines, and tools often becomes challenging during dual-monitor editing workflows. Editors frequently work with complex interfaces where scattered elements can disrupt focus. Wondershare Filmora's structured dual-monitor environment provides a more organized workspace suited for detailed editing tasks.
Dual monitor setups naturally offer expanded visual space; however, Wondershare Filmora’s optimized arrangement supports the handling of multiple clips, transitions, overlays, and advanced color grading in a more controlled manner. This creates a stable foundation for editing professionals seeking consistency in their workflow.
Part 1: Understanding Wondershare Filmora’s Dual Monitor Editing Capabilities
Wondershare Filmora’s workspace is designed with flexible screen control, enabling editors to work comfortably across extended displays. Its drag-and-dock interface allows tools and panels to be positioned freely, creating a layout that supports the editor’s preferred structure.
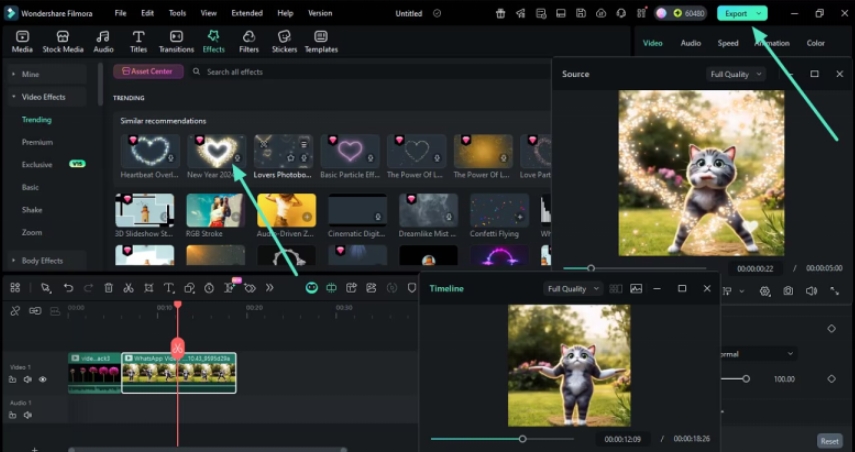
At the core of Filmora's dual-monitor capability are two specialized viewing systems that work in tandem. The Source Monitor serves as a dedicated window for previewing media assets, effects, and transitions before they're applied to the timeline. Meanwhile, the Timeline Monitor provides continuous real-time feedback of the assembled project. This parallel viewing approach allows editors to evaluate individual elements while simultaneously monitoring how those elements integrate into the final sequence, reducing the back-and-forth typically required in single-monitor environments.
Here are dual-monitor capabilities inside Filmora:
-
Drag panels across both monitors
-
Fullscreen preview window for sharper monitoring
-
Extended timeline view for easier precision editing
-
Movable media library, effects, and transitions panels
-
Dedicated space for color grading and audio tools
-
Compare clips side by side without covering the workspace
-
Custom workspace setups that match editing styles
Dual Monitor Editing helps maintain continuity and reduces interruptions across larger projects.
Part 2: Why Setting Up Dual Monitors Properly Saves Hours in Filmora
A well-planned dual-monitor setup contributes to a smoother workflow inside Wondershare Filmora’s interface. When both displays are utilized effectively, editing tasks can be completed with greater accuracy.
Here’s how a proper dual-monitor setup can save significant time:
-
Reduced need for window switching, enabling preview and media elements to remain visible
-
Longer timeline visibility, resulting in faster decisions and fewer errors
-
Sharper preview quality for identifying small details
-
Tools such as audio controls and color grading panels remain accessible
-
One display can be dedicated to monitoring, while the other handles timeline adjustments
These factors support a calmer, more organized workspace.
Part 3: Step-by-Step: Setting Up Dual Monitors for a Faster Filmora Workflow
Setting up dual monitors with Wondershare Filmora’s interface does not require advanced technical skills. The process includes:
Step 1: Connect Your Monitors
Use HDMI, DisplayPort, or USB-C and select “Extend These Displays” in system settings.
Step 2: Launch Filmora
Filmora automatically detects the dual-monitor setup and suggests suitable layout options.
Step 3: Choose Your Layout
Select a preset or create a custom arrangement. A common layout places the timeline and tools on the primary monitor, and preview/media windows on the secondary.
Step 4: Import Clips
Import media files and place them onto the timeline.
Step 5: Move the Timeline Monitor Window
Adjust the Timeline Monitor to a suitable position across either screen.
Step 6: Move the Source Monitor Window
Position the Source Monitor window to complement your chosen layout.
Step 7: Preview and Edit Simultaneously
Use both monitors together to preview and edit. After completing adjustments, export the final file through Filmora’s interface.
This setup supports a more stable creative environment across editing sessions.
Part 4: Pro Tips to Maximize Your Dual Monitor Editing Workflow1. Split Your Workflow Smartly
Use one monitor for active editing (timeline, tools) and the other for preview or reference materials. Clear screen roles prevent unnecessary shifting during work.
2. Customize Layouts for Different Projects
Documentaries may require expanded timelines; short videos may focus on effects. Wondershare Filmora’s customizable layouts support project-specific needs.
3. Use Shortcuts to Maintain Speed
Keyboard commands help maintain consistency across extended workspaces.
4. Keep Important Panels Visible
Frequently used panels, such as color grading or audio meters, can stay open on the secondary screen for better workflow continuity.
5. Optimize System Performance
Smooth dual-monitor editing benefits from:
-
Closing background apps
-
Using proxy files
-
Updating GPU drivers
-
Storing media on faster drives
A well-optimized system strengthens overall performance.
Conclusion
Dual-monitor setups enhance visibility, organization, and workspace clarity. Combined with Wondershare Filmora’s flexible interface, editors can maintain a structured workflow for various projects. With thoughtful layout adjustments and optimized screen usage, Dual Monitor Editing supports improved productivity and smoother project management.
Media Contact
Company Name: Wondershare Filmora
Contact Person: Boby Ruan
Email: Send Email
Country: United States
Website: https://filmora.wondershare.com/